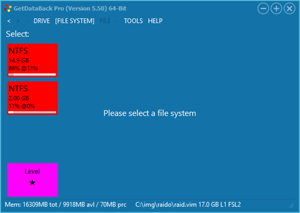
You see a list of the possible file systems GetDataBack has found on the left-hand side of the screen. Don't confuse the file system entries with the list of files and directories you are hoping to recover - you see those in the next step of the software.
Each tile (red in this example) represents a (possible) partition on the drive. If you had more than one partition on the drive you need to recover (for example, logical drives C:\ and D:\), you probably have to go back and forth and select the corresponding entries separately to recover all files.
If there are no entries at all, or entries are missing, there are four possible reasons:
 GetDataBack
generates the file system entries using the information it has collected during
the scan. By
default, the most accurate file system entry is automatically on top of the
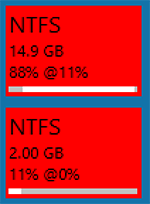
list. In the example to the left, GetDataBack found two NTFS partitions, one
with 14.9 GB and one with 2 GB. The third line of information in each tile
indicates the size and position of that partition relative to the containing drive.
As we had chosen the 17 GB drive in the first step, you can read the tiles like
this:
GetDataBack
generates the file system entries using the information it has collected during
the scan. By
default, the most accurate file system entry is automatically on top of the
list. In the example to the left, GetDataBack found two NTFS partitions, one
with 14.9 GB and one with 2 GB. The third line of information in each tile
indicates the size and position of that partition relative to the containing drive.
As we had chosen the 17 GB drive in the first step, you can read the tiles like
this:
We see, there is a 2 GB partition, followed by a 14.9 GB partition. In its list, GetDataBack gives preference to the larger one.
Sometimes the file system list can contain a confusing number of entries. If the first entry does not produce what you are looking for, you need to examine the entries in greater detail. Look for a file system that comes closest to the type, size, and position of the partition you lost. If the desired file system is not in the list, try to increase the sophistication level by clicking on the purple tile in the left bottom corner.
| NTFS | exFAT | FAT12,16 | FAT32 | EXT | HFS+ | APFS |
 |
 |
 |
 |
 |
 |
 |
| Windows | Windows | Windows | Windows | Linux | Apple Mac | Apple Mac |
Right-click a file system tile or click on FILE SYSTEM->File system info (file system) to obtain a detailed description of the found file system. Our tech support staff primarily uses this information.
As soon as a recovery has begun, you can view the recovery info by clicking on FILE SYSTEM->Recovery info.
In our example, we click on the first entry in the list. GetDataBack now begins collecting files and directories for the Recovery Tree. You can follow the progress in the progress window.
This operation can take a couple of seconds, up to many hours, so you need to be patient. Do not stop this process unless you have to.
If the selected file system is an APFS, the program prompts you to include old file system states.

Use the small left and right arrows in the top left corner for going back and forth between the screens. Pressing the left arrow brings you back to the Select Drive screen. Press the right arrow, and you move forward to the next screen. You can navigate between the screens without losing the progress. If a process needs to unload a current recovery, it warns you beforehand.
At this point, you can save the recovery as it has progressed until now and continue later.
 The purple tile
in the left bottom shows the current sophistication
level. Possible values are 1 (*) to 4
(****). The higher the level, the more file systems GetDataBack might
find. You
can increase the level by clicking
on the purple tile. If you change the level, it is effective going forward. At
the same time, the already completed scan between the Select
Drive screen and this screen is elevated to the higher level by repeating
the scan with the increased level.
The purple tile
in the left bottom shows the current sophistication
level. Possible values are 1 (*) to 4
(****). The higher the level, the more file systems GetDataBack might
find. You
can increase the level by clicking
on the purple tile. If you change the level, it is effective going forward. At
the same time, the already completed scan between the Select
Drive screen and this screen is elevated to the higher level by repeating
the scan with the increased level.
See also: Scan, Save recovery, Recovery info, Sophistication level, File System Details, Checklist